About 8 months ago I enrolled in the Inter kingdom Exchange of the Arts here in Atenveldt. We were paired up with a recipient and given a copy of their survey answers in order to make something for them. My recipient, Bannthegn Natal’ia, likes to wear Middle Eastern garb, so I decided I would make her an accessory. Embroidery is my wheelhouse, so I knew it would have something embroidered on it, as well as the design being geared towards her likes (bunnies!) and personal colors (green and gold). Looking around on the Internet I found a great bag at the Ashmolean Museum, as seen below.
The Extant Example
When looking for a bag, I decided to focus on one from the Mamluk period (1250-1517), likely coming from Egypt, as there are many examples to choose from. This particular bag intrigued me because it was quilted. I have never done quilting so it would be a challenge for me. I've never made tassels either. I noticed that the Ashmolean Museum did not include sizing parameters of the bag on their online collection entry. This information was something I definitely needed and wanted to know. So, off went an inquiry to the museum.
This is likely an amulet bag, so it is relatively tiny. According to the information I received from the museum, the bag is 11 cm x 8.5 cm. The bag is made of silk, with silk embroidery thread, and likely sewn together with cotton thread. The lining of the bag is linen, and the cording is silk. With this information, I was able to start the design process.
The Design Process
The first step in the design process was determining the size, materials, and colors of the item I was to make. I was provided with a set of answered survey questions from my recipient. As noted above, she likes to wear Middle Eastern garb, which is why I chose the bag from the Ashmolean. I wanted this bag to be functional, possibly to hold a cell phone or other small trinkets at events. The size of the extant example was much to small for this, so I decided to make it a bit larger. I chose to do 2 x2 in. squares, as it was easy to find a 2.5 x 2.5 in. quilting square patterning block at my local craft store. I drew out some design options in a graphing composition book, and with the help of some friends, made the design decisions.
This is the basic design of the bag, with the left picture being the final design for the front.
Multiple colors of silk fabric was not something I had on hand, and I wanted the bag to be functional and washable, So I chose to make the bag entirely of the linen/rayon blend that is available at my local craft store. I bought 1/4 yard of each color, and there were 5 colors in total (biking red, blue lake, calla lily, honey, and cayenne). I also chose to use cotton DMC embroidery floss for the tassels and DMC Perle cotton for the embroidery.
Knowing that my recipient loves bunnies, I knew I had to incorporate them into the design. I also chose to use a popular plant design in Middle Eastern design, which is the pomegranate.
I went to my local embroidery store to purchase Perle cotton, and I went a little overboard with my color choices. I probably shouldn't go there unsupervised! I also found some glorious garnet beads at that store to use as pomegranate seeds. I was a little overwhelmed with the different shades that I bought, so I enlisted the help of Dame Cecily de la Warde, and she helped make some hard decisions, and gave me shading advice. Such help for this overwhelmed embroiderer!
I initially wanted to do some of the embroideries that were found on the extant example, in the form of those quatrefoils, rosettes, and stars, however, I ran out of time, and I couldn't figure out exactly what stitch was used. It looks like its maybe a buttonhole stitch, but I'm not entirely sure! So, I left that detail off of the end product.
The Embroidery
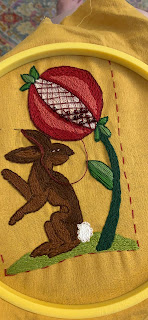
To start the embroidery, I drew the design onto Solvy and pinned it to my fabric. I chose to use the color called honey, which is a lovely yellow, as my ground fabric because that is one of my recipient's heraldic colors. I did the outline in stem stitch, moving between colors for each part. I used stem stitch to outline. To fill I used stem, satin, and I believe some chain on the pomegranate. I also used couching to secure the seeds on the pomegranate.
Here are some progress pictures:
I really need to get better at taking progress pictures. I'm horrible at it. Maybe take a picture when I stop embroidering for the day, so I have a lot to choose from.
When the embroidery was finished, I knew I needed to cut it out to make an applique. The best way to do this, I have learned, is to sew another piece of fabric to it, right sides together, and turning it, much like you would a pillow. This makes it easy to applique onto the bag later on.
Quilting!
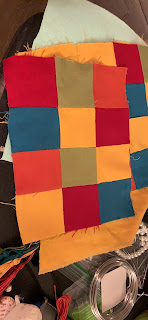
I have never quilted before. Wait, I lied. I quilted my square of a 50 states quilt back in 5th grade. I should probably say, I have never pieced together a patchwork quilt before, and most certainly not by hand. I used the little quilting square pattern block and a rotary cutter to cut out the little squares. I cut myself with the rotary cutter and didn't even notice it! Whoops. Once I had enough squares, I put them in a baggie...and left them there for about a month. I was intimidated by the piecework. I decided to bring it along to Estrella War (otherwise known as Wellie War this year) and work on it while my husband did what he needed to do. I pinned the little squares together and started sewing. I used a double running stitch, with cotton thread the same color as the fabric. At first, I was switching colors with every square, but that was annoying, so I decided to stick with just one color. That made things much easier. Eventually, I had several longer pieces that I needed to sew together to make the fabric. I had to use the iron to press the tiny little seams before I did that. I pieced the fabric for the front and the back separately. I believe I pieced some of it in a way I didn't intend to, but it all worked out.
Here are some pictures of the pieced together bits.
Tassels and Cording
I have no pictures from my tassel making adventure, but they were pretty easy. I followed instructions found on the Internet and used my 2.5 in. wide quilting ruler as the implement to wrap the thread around. Pretty easy. I made 6 tassels.
Cording was another story. I attempted to learn how to do finger loop braiding to make the cording for the bag but was unsuccessful. So, off to the craft store, I went for some premade cording. I found some in the exact green I needed.
Putting It All Together
Before I could piece the bag completely together, I needed to attach the applique to the front of the bag. I sewed it down using a blanket stitch with matching thread. It was fairly easy to do so and very secure.
When putting the bag together, I made the decision to use my sewing machine. I don't quite trust my hand sewing skills to keep it all together. At least the seams of the piecework would be protected. I placed the fabric right sides together, with the tassels pinned in, so when I flipped the bag right side out, they would be happily dangling. Then I worked on the lining. I chose to use her other heraldic color, green, for the lining. I found some directions on how to accomplish this on the Internet, and proceeded to follow those steps. I put the cording ends in between the lining and the exterior of the bag and proceeded to use a whip stitch to attach the lining to the top of the bag. It was a fairly easy process and soon I was done.
The Finished Product
Things I Learned
- How to hand piece a quilt. It's much easier than I thought it would be.
- Bag construction. I didn't know how to put it together at first, but with a little help from Google, I was able to find acceptable instructions.
- Tassels. I can make them now. They're easy.
- Don't buy too many color choices. It's an expensive mistake and too many choices are overwhelming.
I learned a lot with this project. I really enjoyed using the original extant piece as my inspiration and running with my design choices. I wish I could've learned fingerloop braiding, as well as that stitch on the original bag, but I can save that for another project. I'm pretty pleased with the finished project and I can't wait to participate in the next IKEA exchange.


